
It’s one of the most frustrating feelings. Your favorite show, the big game, or the season finale is on, but you’re stuck at work or out of the house. You’re going to miss it.
What if you could just record it, like you used to with an old cable box?
The good news is, you can. TiviMate has a powerful built-in recording feature (often called PVR or DVR) that turns your streaming setup into a complete entertainment hub. If you want to learn how to record shows with TiviMate, you’re in the right place. This guide will walk you through the entire setup, step-by-step.
It’s surprisingly easy, but you need to have the right pieces in place first.
The Prerequisites: What You NEED Before You Start
You can’t just hit “record” out of the box. If your recording feature isn’t working, it’s almost certainly because you’re missing one of these three things.
- TiviMate Premium: The free version of TiviMate is just a player. The ability to record, schedule recordings, and use multiple playlists is a premium-only feature. You must have the paid version.
- External Storage: This is the most common mistake. Devices like the Amazon FireStick have very little internal storage (only 8GB). It’s not enough for video files. You must use an external storage device, such as a USB flash drive, an external hard drive (HDD), or a network-attached storage (NAS) drive.
- A Stable IPTV Subscription: This is critical. The quality of your recording is 100% dependent on the quality of your stream. A cheap, buffering, or unreliable IPTV service will give you cheap, buffering, and unreliable recordings. You need a premium service, like [TiviMate Gold], that provides a stable connection.
How to Record Shows with TiviMate (Step-by-Step)
Once you have TiviMate Premium, your storage, and a great subscription, the setup is simple.
Step 1: Set Up Your Storage Device
First, TiviMate needs to know where to save the recordings.
- For USB/External Drives:
- Plug your USB drive directly into your Android TV box or (using an OTG cable) your FireStick.
- Go to TiviMate Settings > PVR.
- Click on “Select recording folder”.
- Your device will show you a folder directory. Find and select your connected USB drive.
- For Network Storage (NAS/SMB):
- If you have a computer or NAS drive on your network, you can record directly to it.
- You’ll first need to set up an “SMB” shared folder on your computer. This is a technical process, but as [Wikipedia explains], Server Message Block (SMB) is a standard protocol for sharing files over a network.
- In TiviMate’s PVR settings, select “Add SMB Share” and enter the login details for your network drive.
Step 2: Schedule a Recording (Two Easy Ways)
Now for the fun part. You have two main ways to tell TiviMate what to record.
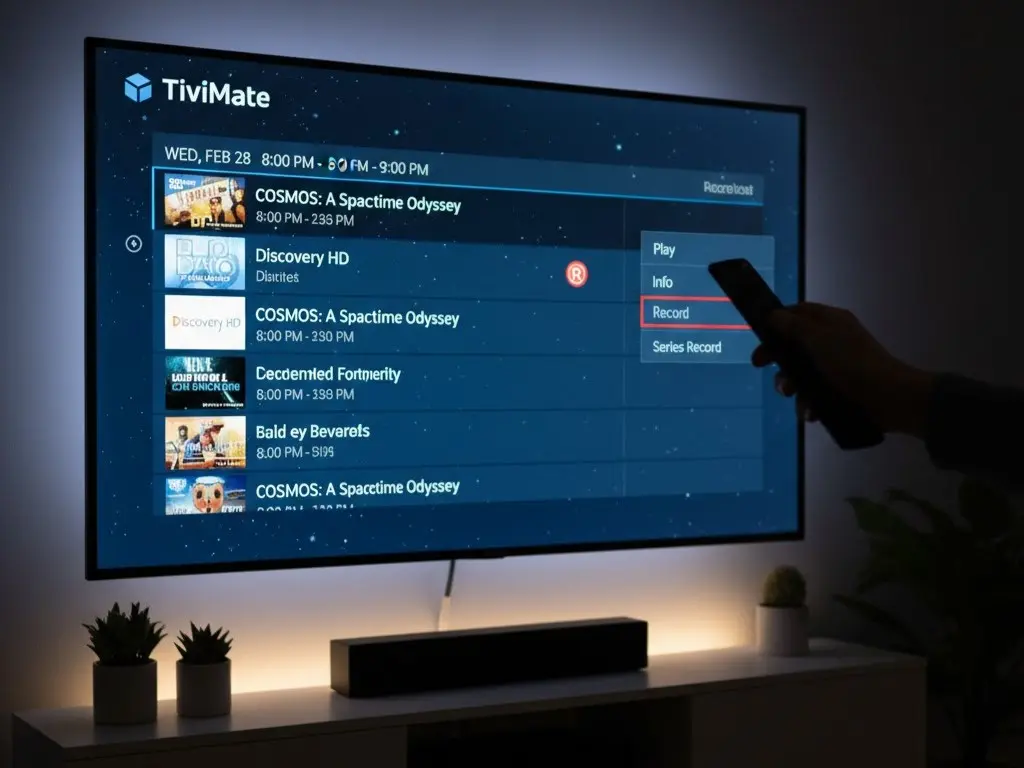
- Method 1: From the Program Guide (EPG)
- Open your EPG (the TV guide).
- Navigate to the future show or movie you want to record.
- Click on the show to bring up the description.
- Select the “Record” icon (it looks like a small circle or target).
- That’s it! The show is now scheduled.
- Method 2: Creating a Custom Recording
- This is perfect for recording a whole series or setting a specific time.
- From the EPG, click the “Record” icon on the channel before selecting a show.
- A menu will pop up. Here you can set a Custom Recording.
- You can choose to record only that show, all new episodes of that show, or all episodes on that channel.
- You can also set custom start/end times (e.g., “start 2 minutes early” to make sure you don’t miss the beginning).
Step 3: Watch Your Recordings
After your show has finished recording, where does it go?
- Go to the TiviMate main menu (press “Back” until you’re at the channel list).
- Select “Recordings” from the menu.
- All your saved shows and movies will be right there, ready to watch anytime.
Common Problems & Troubleshooting
- “Recording Failed” Error: This is almost always a storage issue. Either your USB drive is full, it’s formatted incorrectly (use FAT32 or NTFS), or it became unplugged.
- “My recording is choppy/buffered”: This is not a TiviMate problem; it’s an IPTV subscription problem. Your provider’s stream was buffering while you were recording. This is why a stable, premium subscription is essential.
- “I can’t see my USB drive”: Your device (especially FireStick) may need an “OTG cable” to properly read a USB drive. Make sure the drive is formatted correctly and plugged in before you open TiviMate.
Knowing how to record shows with TiviMate completely changes your streaming experience. You’re no longer tied to a live schedule. By pairing the power of TiviMate Premium with a rock-solid IPTV subscription, you can build a media library that’s ready whenever you are.
Have questions about setting up your recordings or need a buffer-free subscription that’s perfect for PVR? Our team at TiviMate Gold is here to help. We provide premium, buffer-free subscriptions and can walk you through the setup for any of these players.
Click Here To Contact Us on WhatsApp for Personalized Support.